Sunday, March 31, 2013

Spring Brunch Menu

Happy Easter everyone!  What a day of celebration - filled with faith, family and food.  I hosted my first Easter brunch this morning.  I didn't go all crazy with ideas from Pinterest (though I really wanted to);  I kept it simple and focused on enjoying the last weekend of my Spring Break.  We served the traditional Southern Easter fare:
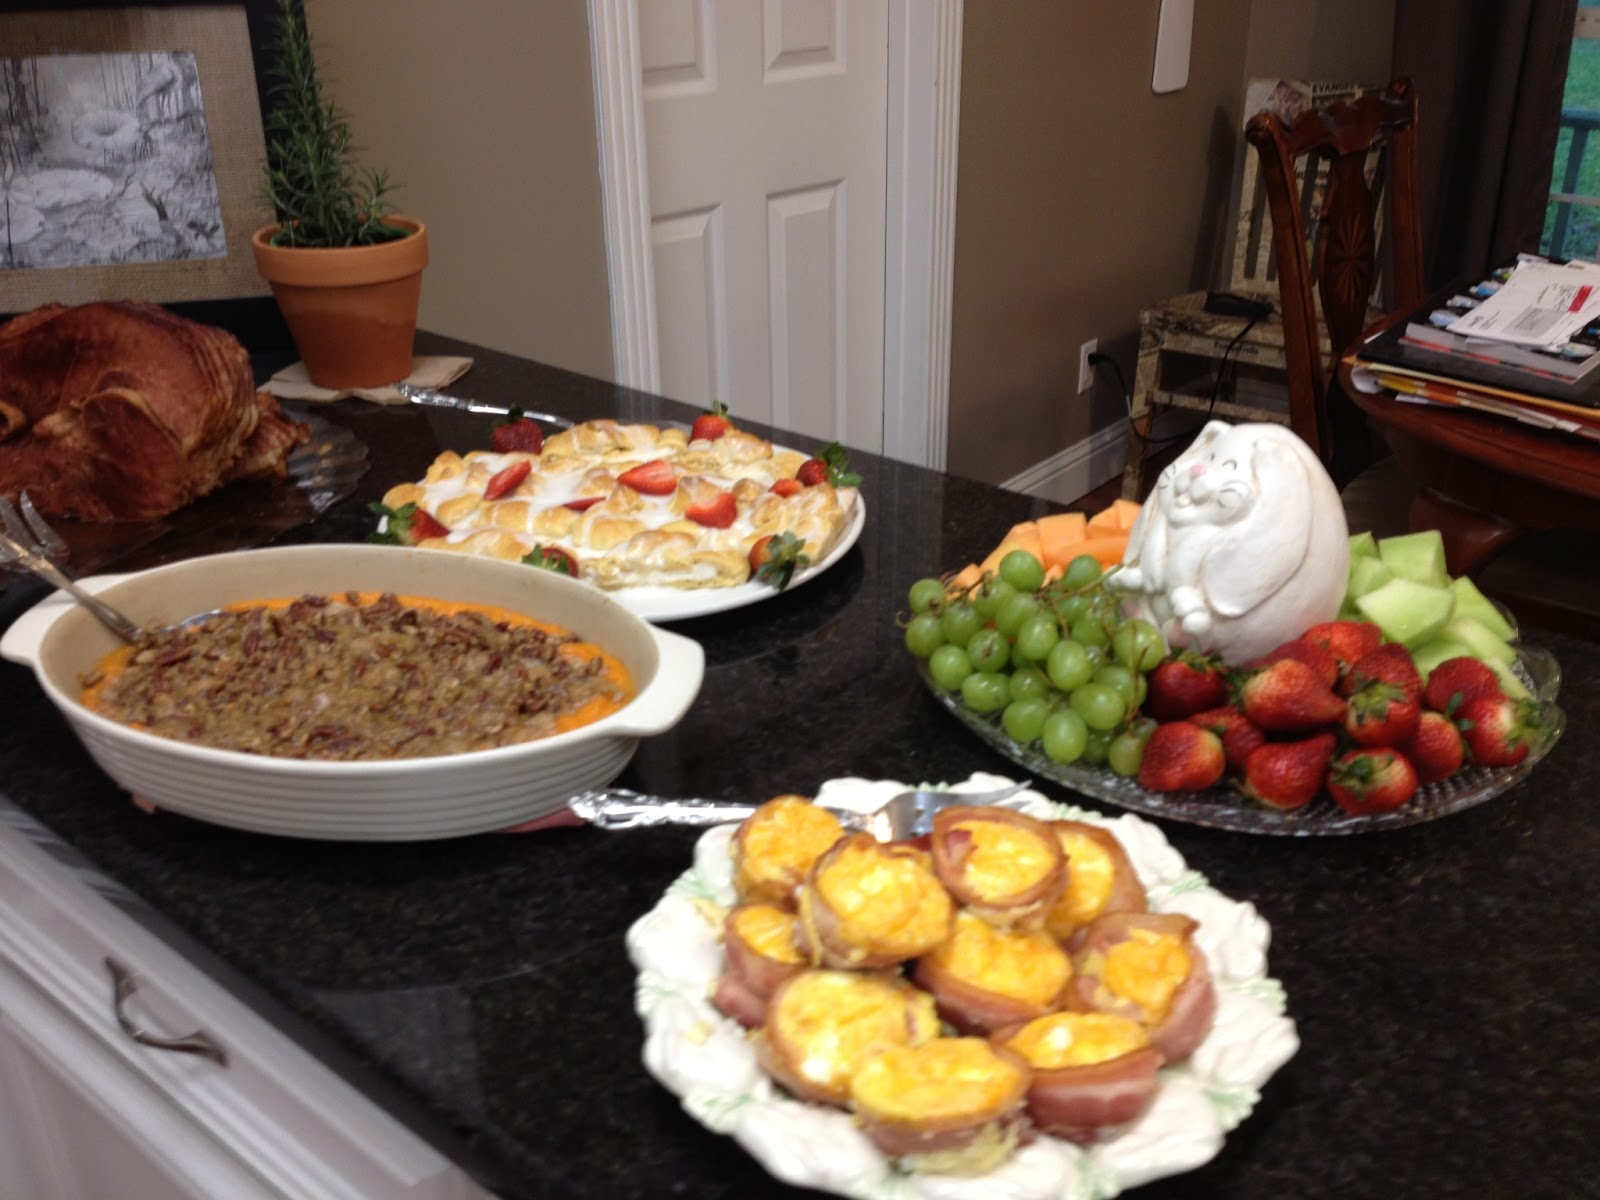
Glazed Ham, Sweet Potato Casserole (a treat from my childhood), Cream Cheese Danish, Bacon and Egg Cups, Deviled Eggs, Blueberry Muffins, Fresh Fruit, Shaved Pineapple Ice, and a Baptist Girl's Mimosa (orange juice and Ginger Ale).

I thought I had better add the recipes here so that I can keep up with them.  (I am forever jotting down foods to try and then losing the recipe cards somewhere in my cabinets:)

Cream Cheese Danish 


Crust: 
2 packages Crescent Rolls 

Filling: 
8 oz pkg softened cream cheese 
2 tsp sugar

Glaze: 
1 1/2 cups powdered sugar 
5 tsp milk

Lay the crescent rolls on a flat baking sheet with long sides together.  Press edges and perforations to seal.   With scissors or sharp knife, make cuts 1 1/2 inches apart on long sides of the dough.  Mix cream cheese and sugar together and spoon filling down the center of the dough.  Use a knife to spread the mixture evenly. Twisting each strip once, alternately cross strips of dough over filling.  Bake at 350 F until rolls are browned.  Mix sugar and milk for glaze.  Pour over cooked danish. 


Sweet Potato Casserole

4-5 cooked sweet potatoes
1/3 stick of butter
1 tsp vanilla
1/3 cup of milk
2 well beaten eggs
1/2 cup sugar 

Topping:
1/2 stick butter
3/4 cup brown sugar
2 tbsp flour
1 cup chopped pecans


Cream butter and potatoes.  Add other ingredients and blend well.  Place in a casserole dish.  For topping, mix all ingredients together until it becomes crumbly.  Sprinkle on potatoes.  Bake uncovered at 350 F for 30 minutes.

I can't remember ever going to a church social when I was little and not having sweet potato casserole.  In fact, there are 3 variations of it in our old church cookbook.  It cracked me up to see it listed under the vegetables sections.  There is so much sugar in it that it could easily be classified as a dessert:D 


Mini Bacon Egg Cups

12 slices of bacon
9 eggs
1 cup cheddar cheese
Salt and Pepper

I found this recipe on Lilly's blog, Recipe by Photo, first.  She attributed it to Julia who writes Fat Girl Trapped in a Skinny Body and shares tons of scrumptious recipes.  This was so easy and sooooo delicious!

To make:
Wrap a slice of bacon inside the cups of a muffin tin.  Whip up egg mixture and pour inside the bacon lined cups. Bake at 350 F for 30 - 35 minutes.  The eggs puffed up beautifully and the bacon flavor permeated the mixture.  It was divine.


Shaved Pineapple Ice


1 can of frozen Pineapple Juice
2 cans crushed pineapple
2 personal sized containers of peach yogurt

Mix ingredients together.  Pour evenly into 3 small plastic containers and freeze overnight.  Use an ice shaver  to slice through the frozen mixture.  I served the pineapple ice in teeny tiny trifle bowls which made for perfect portions.  


I am not a cook, but these recipes were so easy that even I could follow them successfully.  Some were prepped yesterday, but most were whipped up this morning in less than an hour.  Everything went into a 350 F oven and baked for about the same time.  Quick! No stress!  And great tasting!  I will definitely make these again.    

Friday, March 29, 2013

Fluffing the Nest for Easter

     After finishing the backsplash. I looked around my kitchen and pretty much panicked.  The ends of the kitchen didn't match the middle with the new counter and backsplash.  The walls are taupe.  The cabinets are white.  Mike likes high contrast, so we went with black countertops and white backsplash. We have cool white fluorescent lights which seemed to accentuate the white cabinets and turn the place into something other than my inspiration picture.
     With the hard surfaces in the kitchen now in place for years to come, I needed to do something to help the colors flow from one end of the space to the other.  I hit the stores and then spent the last two days playing with accessories, dishes, and flowers- you know, the fluffy stuff that truly makes a difference.

I found the table runner and recycled tire basket lined with burlap at Hobby Lobby

stitched a complementary tablecloth and topper from muslin and linen,


 used dishes I already had (Vietri Incanto Stripe), 


and added brown eggs and white tulips to clear glass jars to sit on each side of the cooktop by the breakfast bar.


It's official: the nest is fluffed and  ready for Easter weekend.

Linking up this week with:
Life on Lakeshore Drive

Wednesday, March 27, 2013

The Backsplash is Grouted!!!

This has been a busy week!  We decided on a tile, installed the backsplash and now, grouted the space. Grouting was actually harder than I thought it would be and it took more time (about 4 hours).  We started by mixing PolyBlend's non-sanded, bright white grout from Home Depot.
We used a clean bucket to mix the powdery mix with water.  
The first batch was too thick, which made it challenging to apply.  
After adding a bit more water and the grout spread more easily.
 The grout began to firm up after 10 - 15 minutes.  
(I literally sat there watching the grout dry.   I was so excited to start wiping the walls down:)
We used the wrong sponge at first.  The big sponge was pulling a lot of the grout out.  Mike made a quick run back to Home Depot and picked up a  couple of sponges with a smoother finish.  Having two sponges was  actually a big help.  Mike was able to wipe the walls with one, while I rinsed the other.  It made for a quicker finish time for this part of the process. 
After wiping the tile with the sponge, a slight haze was left on the tile.  The directions for the grout recommended waiting a couple of hours before buffing the haze away.  We waited overnight and had no problem scrubbing the residue off this morning.  And, here's the finished result: 
I love the way it turned out.

Tuesday, March 26, 2013

Backsplash Install

I couldn't wait 24 hours after finally choosing the backsplash to start the install.  We decided on the 2x4 glossy white mosaic from Lowes by American Olean.  Cost: only $3.57/sq ft  It was the cheapest of all the tiles considered though price was not a factor in the decision process.  (However, after recognizing the savings, I admit, when I found the same tile, different brand. at Home Depot for a $1.10 less, I briefly considered another trip back to Lowes.  Because I had literally been in Lowes 11 times already this week, I opted to pay the extra $ and head home to INSTALL MY NEW TILE).
We got an early start and figured it would be about a 1/2 day's job.   We covered our new granite with brown craft paper and decided not to install backerboard after reading many blogs where others installed the tile directly to a painted wall.  Fingers crossed that they were right!  Applying the tile adhesive directly to the drywall helped us get to the fun stuff faster.
Using sheets of the mosaic tile made us feel down-right optimistic that we would have the wall whipped out in no time.  That was until the sheets started sliding down the wall (too much adhesive?) and then I noticed the spaces were not uniform.  No problem, it was a tiny area 18"x18".  We quickly cut the tiles apart and used spacers to keep the tiles equidistant.  The first section looked fabulous!  On to the next section, which is a bit bigger with wide open spaces.  I thought tiling with the sheets would make the job go quickly.  There were only 3 plugs, so very few cuts.  We threw 3 sheets of the tile on the wall only to notice that now the spacing on the tile sheets didn't match the first tiny section of perfection. Ummm...that is a problem.  Seriously.  I tried not to make a big deal about it, but I am very particular about symmetry in everything I do.  It takes hours for me to put up a bulletin board at school if I don't have a straight edge and spacer for the letters.  I honestly can't help it.  And somehow this quirk in my personality managed to escape my precious husband of 22 years until now.
 Once I realized the spacing was not right nor would ever be right when all of the little tiles were attached by globs of adhesive on the backs of the tile sheets, the only way I knew to correct the problem was to cut the tiles apart.  We put a towel down on the granite bar, placed a thin sheet of wood to be used as a cutting board and started slicing.  My father-in-law grabbed a knife and went to town.
In no time, he had a box full of single pieces of 2x4 tile.  I haven't stopped to Google the availability of said tile.  If I did it again, I would see if these were available in anything other than sheets since we used over 675 tiles. Armed with single tiles, adhesive, and 1500 spacers, I set to work,  Mike did the cutting and I placed the tiles.  It took a bit more than the estimated 1/2 a day...more like 10 hours with 2 of us working (and an emergency run for more spacers, 1500 didn't quite do the job), but I love the results.  The tiles are symmetrical!!!
We still need to grout,  
but we are happy with the results so far.

Monday, March 25, 2013

Which Backsplash...aaaggghhh???

    I think I have spent more time in my kitchen these past few weeks than ever before.  I have painted cabinets (well the lower section, at least...I still have the upper ones to tackle), ripped out laminate and installed granite, and now, picked the backsplash.  Selecting the backsplash was trickier than expected.  I struggled in choosing between the inspiration room's subway mosaic and a beautiful natural stone found at Lowes.  
Image from FastFloors
     The designer of the inspiration room had installed Crossville Tile's 1x2 Savoy series glossy white.  The closest Crossville distributor was actually 3 hours away.  I made a quick call to the rep and he generously sent a sample which arrived within 3 days.  I was beyond thrilled when the UPS man delivered my sample.  Unfortunately, when we held it on the wall, we didn't loooovvvve it (and after waiting 13 years to "do the kitchen", I thought we should).  The tile was beautiful and it looked fabulous in the pics, but on our long run of cabinets (12 1/2 feet) and the 1x2 pattern looked waaaaaayyyyy too busy.  
Image from Lowes
     I headed to Home Depot and Lowes to find an alternative.  Lowes had a soft white natural stone with gray striations which was beautiful! I brought home two boxes and we all agreed - it was the one.  It wasn't the bright white of the room, but it was gorgeous.  After agonizing over the choice for days ( I polled friends, family, and even my students), we chose the natural stone.  Unfortunately, it was gorgeous only in small batches! When we laid it out prior to installation, we realized it didn't work.  Some stones featured gray, but most were white with brown spots!  I hate brown spots!!! Aaaaggghhh!  I had bought 28 boxes from 2 different locations (2 different lots/runs + natural stone = major variations!!!)  I couldn't put the brown spotted tiles back in their boxes fast enough.  
     Mike and I loaded up the stone and headed back to the store.  Now, what?  I had liked everything about the inspiration room.
Image from A Postcard from Paris
I wanted to recreate the feel without  using the tiny mosaic. 
Image from A Postcard from Paris
I looked through other kitchen pics I had collected on my iPad and phone over the past few months. They all had a high contrast between the backsplash and countertops.  They tended to be bright and white.  Many had a subway tile backsplash.  I like traditional subway tile, but I liked the smaller tiles from the inspiration house too.  I went back to the tile section of my big box stores and found this:
a 2x4 glossy white mosaic, my new backsplash!
So much effort...and we still have to install it :)

Saturday, March 16, 2013

A Piece of the Past

A few weeks ago, land near us sold.  It was a property we rode four-wheelers on for years and loved to explore.  It was always fun to ride by the old home place and imagine the family that once lived there. When an acquaintance of ours actually purchased the place, we knew we wanted a piece of the past before it was torn down.  After a quick phone call, we had permission to "enter at our own risk" and take a souvenir or two.
The house had been solid in its day and was still filled with pieces of history.
(We saw a name and a date from 1915 written on the hallway wall.)  
We picked up a window, several panel doors,
 a Hoosier cabinet, a roll of wall paper and a couple of doors from the kitchen cabinets. 
Okay, so we salvaged more than one or two items, but there was so much good stuff!
 I absolutely loved the splashes of blue which we found in the kitchen and on some of the doors and I felt compelled to rescue everything.  My mother in law took one of the kitchen doors, 
wiped it down to remove the grime and wound up with this beauty!
She added the fleur de lis, but everything else is original to the door.  Needless to say, I want one!!!

Kitchen Renovation Begins

Operation Inspiration Kitchen begins!!! A few weeks ago, I posted pics of my dream kitchen designed by A Postcard from Paris. The photos were all I needed to begin my newest (and long overdue) makeover...the kitchen. Our kitchen was beginning to look a bit lived in. It not only could stand a little Spring cleaning, but also some modernizing:). I live in the sticks and I don't mind a little Southern charm, recycling or upcycling. This week though, I went brand new. I managed to paint the lower cabinets,  add corbels to the island,  and change out the counter tops!!!!
     I shopped around for just the right look and realized the price of the counter top depended upon where I actually purchased the slab.  I visited 3 stores, one small store that mainly carried flooring, but also offered solid surfaces, a large box store where I was told that I would not be able to pre-select a slab or negotiate where the seams would be placed, and finally Classic Stone Interiors in Bossier City, LA that deals primarily in granite.  The staff at Classic Stone was wonderful.  No problem that the stone I wanted was not in stock...they gladly ordered it.  No problem that I wanted to talk about where I wanted the seam...I actually received a preliminary sketch for approval.  No problem that I wasn't sure what the fancy names for the edges were...they patiently showed me examples of each.  The biggest bonus of all...Classic Stone was actually the least expensive, but the most professional!
They measured.
We tore the old laminate out (gotta save money for the rest:).
 I am in love with the Black Pearl granite with its consistent pattern and beveled edges.
 We added a new stainless sink and faucet that is spot resistant. 
 Mike actually picked the faucet set which included a soap dispenser, a nice handy addition that will eliminate the family size Dawn bottle that has adorned my counter for the past 20 years.
We had to remove the molding on the back side of the island to add the extra supports.  During the removal of the old stuff, the wood on the island tore a bit.  Mike has patched, sanded, and put one coat of paint on the area.  It is not complete yet, but I am loving the corbels already.    I am off to find tile for the backsplash. I hope to find a basic white mosaic that will stand the test of time or at least the next 12-15 years:D

Monday, March 4, 2013

Adding Molding, Adding Height

In last week's #MyHouseMonday's post, I shared pictures of the house which inspired our paint choice.  While visiting the house, I was a bit envious of the extremely tall ceilings.  The rooms felt so big and roomy that I found myself feeling downright tiny.  There were so many things I loved about the house that I knew I wanted Mike to visit the house with me,  so that we could figure out which features we could copy:)  After hearing me rave about the ceiling height for 30 minutes on the drive over, we walk into the space and Mike looks at me and says, "These ceilings are the same height as ours."  "No, it can't be.  I don't feel short in our rooms.  What is the difference?"  The transom windows!
The architectural detail automatically draws the eye upward and accentuates the vertical height.  

Image from Houzz
                                               It's true, look at how tall this room seems!
Image from Design Chic
Ok, so while I love the light airy feeling created by the transom windows, I mainly liked the feeling of height.  Since it was not financially practical to add the transoms to the cased openings in our living room, we came up with an alternative...molding.
 Just look at how short the doorway looks.  Until...we added molding:)
 We did 5 openings in all.  Each span was about 4 feet wide.  The whole project cost a bit less than $100 (much cheaper and more practical than adding transom windows).
 This project was simple, inexpensive, and gave the same feeling of extra height...perfect!!!

Sunday, March 3, 2013

Squeezing in Updates When I Can

Why is it that during the week when it is time to go to work, I struggle waking up, but on Saturday morning my internal alarm goes off at 7:00AM and I hit the floor running?  This weekend, I was able to squeeze in a little Spring cleaning, before heading off to tutor.  After packing pots, pans, and pretty much everything else into my kitchen cabinets for the past 13 years, it was time to take some of the junk out!  Not the most glamorous project I have tackled, but certainly needed!
I started by emptying everything out of the drawers in the island.
I wiped the space down with my trusty, Mr. Clean Magic Eraser (can't live without it!) 
and then vacuumed the inside of each drawer.
I found the cutest Contact paper at Target when Mike and I were out Friday.  
I measured once and cut all six.
I found it easier to peel the paper backing off before placing it in the drawer.  The Contact paper was pretty forgiving and I was able to move the sheet around until I was happy with the placement.
When I had it like I wanted it, I used a soft dish cloth to brush lightly across the paper to remove the air bubbles.  Then, I applied a bit more pressure to get the paper to stick.  It took a little more than half an hour to complete the project.  While I plan to line the rest of the cabinets in plain white, I will definitely be on the look out for other fun patterns and colors.   This was such an easy update, I may make a habit ofchanging out the lining more than once every decade.  The island drawers are looking fresh, clean and ready for Spring.