Saturday, May 25, 2013

Outdoor Entertaining

It is officially the first day of summer here at our house.  The kids are out of school, both my biological ones and the 500+ others I work with from August to May.  Personally, I still have one more month to go, but just the thought of work without the hustle and bustle created from shuffling from one class to another, the looming deadlines of projects and papers, and the regular ringing of the school bells kind of makes me think it is summer.  And that makes me excited!!!  Summer brings a more relaxed attitude, thoughts of upcoming vacations, and time to re-connect with friends.  I am entertaining the idea of entertaining this summer.  I am inspired by these beautiful outdoor spaces.
Via
I absolutely love the use of cut wood as pedestals for the flowers and candles.  This I can do!
Via
And look at this with its adorable chandelier and roaring fire...probably not happening this summer in Louisiana, but beautiful just the same!
Via
I absolutely love, love,love the clear glass globes hanging like little stars from the branches over head.
Via
I think it must be the unexpected lighting paired with the soft patina on the worn wood pieces that keeps drawing me in to this outdoor space.
Via
Whether it is a soiree for 20 or a party for 2, I am looking forward to slowing down a bit,  surrounding myself with people I love, and enjoying at least one evening beneath some twinkle lights this summer.

Tuesday, May 21, 2013

Dreamy Closet Spaces

It's official!  It is time for a closet re-do.  Right now, I am in the" thinking stage" of actually cleaning out the closet and transforming it into something worthy of a feature spread in my favorite magazine a functioning space, but I am thinking:)  I feel so claustrophobic every time I walk into my tiny closet.  To say it is a "walk-in" is stretching it I think, but technically I have to take 2 steps to reach the back clothes bar.  So, is that the legal definition of a "walk-in"?  Either way, it is shoved full of stuff from floor to ceiling.  Most days, I have to kick the shoes away from the door just to get it to close (and many days I just leave the cluttered space wide open, because I don't take the time to move the kicks!  Grrr!) What should an organized closet look like?
Via
Okay, to aspire to this is a bit unfair to my 4' x 6' space, but I love the floor to ceiling storage and the gorgeous chandelier.
Via
This seems a bit more realistic.  The storage system takes full advantage of the entire space and while the closet does seem packed, the doors do appear to be able to close.  Already better than mine right now!
Via
While I think this is absolutely beautiful with its intricate mouldings and elegant lighting, there is absolutely no way that I could ever, ever, ever have open shelving and have it look like this, but it is so fun to dream.  And since I am dreaming...
Via 
  I could go ahead and empty out my bedroom to create this space, but then I would need to go shopping just to fill it up and I would have no place to sleep at night!  Back to reality...I need a space to store sweaters and tees, bins for my top shelf, and a place to hang necklaces.  It would be nice if the finished space had a bit of pizzazz, but it will be a BIG improvement just to be able to shut the door.

Monday, May 20, 2013

My House Monday: Letting My Little Light Shine

I made it...just barely...in time for #MyHouseMonday, a totally self-imposed deadline for at least one weekly project.  I am ashamed to say, I have pushed the deadline with only 2 hours to spare (we started at 8ish)!  This week's (and a bit of the last few weeks') dilemma has been deciding which light fixture to hang above the kitchen table.  Okay, that sounds ReALly shallow and in truth, that hasn't been the only dilemma at the house.  We have had a rough couple of weeks around here, but working on the house has proved to be a nice escape.  In fact, I got up extra early this Monday morning before reporting to work at 7:30am just so I could swing by Home Depot.  (I can't seem to help myself!  I love that store.)  Back to the lighting...
I thought I wanted rustic.  Definitely cottage.  Hinting at coastal.  I looked high and low.  And I actually purchased three different lights.  Then...I went with something totally different.  
Shiny? Yes!  Sparkly?  Of course!  I feel a bit like Dori in Finding Nemo.  It is so freshly hung that it doesn't even have all of its bulbs yet.  But I love it!
It is coming together.  Slowly, but surely, I am making progress.
Somewhere along the way I have moved a bit away from the inspiration picture and started just filling it with stuff that inspires me. (Lots of dishes!)
I am mixing it all together to create a room I want to be in and since I am hanging out in the kitchen more, I find myself cooking more...much to Mike's delight:)
Okay, I now realize I could center the rosemary and pick up my keys before snapping a picture next time, 
but other than that, I think I am almost done with this end of the kitchen!

Sunday, May 12, 2013

Old Door to Nearly New Headboard

Inspired by the many images on Pinterest and the web for re-purposed doors, I started a transformation of my own this weekend in our master bedroom.  We have a shed full of wood, windows, and doors that we managed to salvage from a late 1800s house earlier this Spring.  Mixed in the pile was a gorgeous chippy blue beauty that was rescued with love during the plunder.  As soon as I saw the it that day, I knew if I got nothing else, I had to have THAT door.  It was one of those gently worn items that beckoned to me despite its battered appearance.  I loved the color and the character and knew I wanted to use it in my home.
  I wasn't exactly sure what I wanted to do with it until this weekend.  I kept thinking that I needed to turn the door sideways to create a traditional headboard, but I didn't want the door to lose its charm by hiding it behind tons of pillows.  After seeing a picture of doors that were turned upright behind a bed, I fell in love!!!
I grabbed the sander and got to work.
I tried sanding the door down to its natural wood finish (like in the inspiration pictures) and it lost all of its appeal to me.  The doors in the inspiration pictures had elaborate moldings...this one, not so much.
Previously home-made headboard getting the boot.
So, I flipped it over and tried again.  I gave it a quick once over with the sander 
to remove the loose paint and grime and brought it inside.  
I hung a piece of ironwork on the door and centered it up between the windows.
I left the old hardware attached and just wiped the metal down to remove the dust.
Disclaimer (in case my mom is reading this):  The bed really was made.  I moved the pillows to shove the door in place:)
All of the pictures I saw had two doors placed side by side to run the width of the bed, in fact, that was what made the pictures so attractive, but my room is full of windows and two doors would be one too many.  I was so disappointed when I realized the single door looked too skinny for the wall!  It definitely needed something else to help fill the space out.
I decided on brushed nickel wall sconces.  They plug directly into the wall so, no special wiring was required...yay!  
While there is still more to do (isn't there always???), I am liking it so far.

Saturday, May 11, 2013

Decorating with Doors

I love old doors.  I am not sure if it is because my imagination runs wild as I think about where they came from or if it is due to the fact that there seems to be endless uses for them.  With a shed full of rescued beauties, I have gathered quite a collection of ideas for re-purposing.
Via
I have seen message boards, room dividers, tons of headboards, and even a swing.
Via
I think I have decided on making a new headboard for summer with one of the doors in the shed.  
Via
I have a five panel door that has a chippy aqua coat of paint.  It was picked up on our old house adventure.  
Via
It might be a fun way to add both a splash of color and a touch of nostalgia.
Via

Friday, May 10, 2013

Crushing on Wood and Iron Chandeliers

Ever since seeing the gorgeous wood and iron chandelier used in the HGTV 2013 Smart Home, I have been slightly obsessed with finding one to hang above my breakfast table.
Via
I don't think I had actually noticed them before now, but I love the mix of rustic iron with the whitewashed wood.

Via
I love that they go from super simple to very ornate and they seem to range in price as much as they range in style.  
Via
I have seen some that you can actually make and others that I wish I could...
Via
The curvy lines mixed with the carvings in the wood...beautiful!  Here are my top picks so far:


1.  Via South of Market
2.  Via Andella Home
3.  Via The Designer Inside's Blog
4.  Via Coastal Cottage Home


I love, love #4, but it is definitely out of my price range.   The second is super cute and simple and might be perfect for a tiny breakfast nook.  What do you think?  Which would you choose?

Tuesday, May 7, 2013

#TasteofHome: Grilled Chicken with Crawfish Gravy

When I started this blog, I never thought I would be blogging about food (I am definitely not a cook... but I do love to try.)  Here lately, I have been dabbling with crawfish and shrimp.  Now, I am not sure if it is because it is Spring (crawfish season) or if my body is actually missing a nutrient (I haven't stopped to Google what that nutrient might be), but the crawfish signs peppering the roadside seem to be calling my name this year!!!  And inspired by the new kitchen updates, I am in the mood to whip up a meal or two.  I have been piddling around with a few recipes and came up with something I thought was worth sharing and a new theme for blog posts.  So here it is, the debut of #TasteofHome Tuesday featuring:

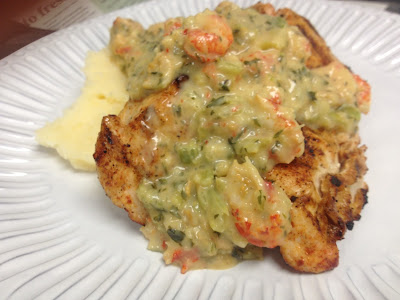
Grilled Chicken and Crawfish Gravy

4 chicken boneless skinless breasts
Tony Cachere's Seasoning

3 tbs butter
3 tbs minced onion
2 tbs parsley flakes
2 tbs minced garlic
3 stalks of celery
salt
cayene pepper
3 tbs flour
1 cup of milk
black pepper
2 tbs white wine
1 16 oz pkg crawfish tails
 (I made it up, so no nutrition info.  )

1.  Split chicken breasts and sprinkle with Tony Cachere's cajun seasoning.  Grill the breasts.
2.  In a large skillet, melt butter.  Add onion, parsley, garlic, celery, salt, and cayene pepper.  Cook veggies on medium heat until slightly browned and tender. (7 - 9 minutes)
3.  Add flour to skillet and cook for 1 -2 minutes, stirring constantly.
4.  Slowly add milk, black pepper, and wine.  The gravy will begin to thicken.
5.  Add crawfish tails.  Let simmer for 3 - 5 minutes.

I ladled the crawfish gravy over the grilled chicken and served with mashed potatoes.  It was, oh, so yummy!  For me, this was a week night meal, which is why I used the dried onion, garlic, and parsley (it was quick and easy).  If you were trying it on the weekend, you could always take the time to chop fresh ingredients.  Either way, I hope you like it.

Monday, May 6, 2013

No More Naked Windows

After 13 years, my windows are naked no more!  My wonderful, talented father-in-law finished them off this week.  Let me back up a bit... Mike and I have been working on the kitchen for the last month or so.  We have updated countertops, installed a backsplash, and added a few accessories.  After pouring over tons of blogs and looking at numerous homes on Houzz, our heads were swimming with possibilities. In fact one Friday night, we spent an hour sitting at the kitchen table just staring at the walls.  "Should we install board and batten?  How would we do it?  It is adorable, but will it stand the test of time or seem dated 10 years from now???"  After much deliberation, we are no closer to a decision on the b&b for the kitchen walls, but we decided to go ahead and add trim to the bay windows.
They were so bare.  When we first moved in, I hung valences, but removed them when I repainted the walls.  I liked the unobstructed view to the lake, so I decided to leave them off.  I am ashamed to admit, we had never even painted inside the sashes and over time the sheet rock began to crumble.  Looking at the picture here, I think it seems so unfinished.  After googling scads of pictures, I decided that I wanted to treat the windows as one unit. Treating the three windows as one seemed to make more of a statement than trimming each window separately   Since we still don't know about the rest of the wall, I figured this might be it and I had better make the trim hefty.
My father-in-law spent about a day and a half working on them.  He trimmed inside each window frame with 1/4" birch plywood  
and then made trim pieces with a router bit (Roman Ogee curve). 
The trim pieces covered up the rough edges of the plywood and butted up to 1"x6" used to fill in between the windows.
He turned a small piece of wood sideways to make a right angle with the 1"x6" boards and then staggered two layers of the molding on the edges.  It made the window look much bigger.
After puttying, caulking, and painting, I think it looks great!  I am loving My House this Monday!  
 Now, only about a gazillion more projects before we finish the kitchen:)  What do you think, should we add board and batten to this wall?  Can you do just one wall or do you have to do the whole room?  Comments and ideas are appreciated!

Thursday, May 2, 2013

Door...Score!

I am so excited to share what I have been working on this week.  Recently, my mother-in-law picked up a couple of doors that had been cut in half at a garage sale for only $1!!!  I mean really, a $1??? Why can't I ever find a deal like that?  
After looking at it for awhile, we decided that it would be perfect as a chalkboard.
To make it, I taped off the panel and painted the outside portion with Home Depot's Behr Bali Bliss (sample size: $3)
Then, I gave the center panel a couple of coats of chalkboard black and tacked on a piece of decorative trim.
I used a tiny brush to clean up the edges around the black, painted out the wooden trim in the Bali Bliss and then rubbed over the scroll work with a watered down black acrylic to add dimension.
It was finished off with a piece of iron work.
(It is funny how taking pictures indoors changes the paint color.  The first pics were taken outside in the sunlight and show the rich turquoise color.)  Here is the completed project...re-purposed and upcycled.